티스토리 뷰
UICollectionView는 사진 앱처럼 하나의 Row에 여러개 아이템을 보여줄 수 있는 UI이다.
처음에는 이 UI가 있는 줄 모르고
UITableView에 아이템마다 UIStackView로 구성하여 크기를 맞춰주는 방법을 계속 고민했었다. (그러면 엄청 복잡할텐데)
아무튼 이 뷰는 Cell의 가로 길이에 따라 Column 개수와 Row 개수가 정해지며
사용 방법은 UITableView와 유사하다.
1. 스토리 보드에서 빈 컨트롤러에 UICollectionView를 추가한다.

2. UICollectionViewCell에 dentifier를 지정한다. ("TestCollectionCell"라고 지었다.)


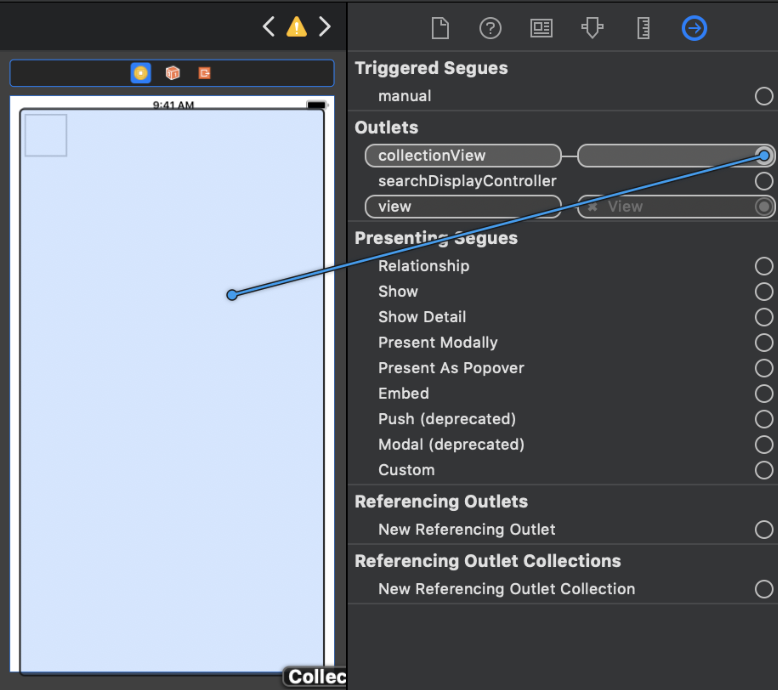
3. TestCollectionViewController.swift를 생성하고, 스토리보드 뷰와 연결할 뷰를 선언하고
// TestCollectionViewContoller.swift

class TestCollectionViewController : UIViewController

	...

    @IBOutlet weak var collectionView : UICollectionView!

	...
}
컨트롤러에 TestCollectionViewController 적용 후 뷰를 연결해준다.


4. UICollectionView를 사용하기 위한 Delegate, DataSource를 등록한다.
// TestCollectionViewController.swift

class TestCollectionViewController : UIViewController, UICollectionViewDelegate, UICollectionViewDataSource {

    @IBOutlet weak var collectionView : UICollectionView!

    override func viewDidLoad() {
        self.collectionView.delegate = self
        self.collectionView.dataSource = self
        self.collectionView.reloadData()

    }

    func collectionView(_ collectionView: UICollectionView, numberOfItemsInSection section: Int) -> Int {
        return 32	// 32개의 아이템을 보여준다.
    }

    func collectionView(_ collectionView: UICollectionView, cellForItemAt indexPath: IndexPath) -> UICollectionViewCell {
        let cell = collectionView.dequeueReusableCell(withReuseIdentifier: "TestCollectionCell", for: indexPath) // TestCollectionCell은 스토리보드에서 등록한 Cell Identifier

        return cell
    }
}
5. 결과 ( Cell 크기는 50 * 50 ( 기본크기 ) )


반응형
'IOS' 카테고리의 다른 글
| XCode Unable to prepare <device_name> for development (0) | 2022.03.04 |
|---|---|
| Xcode CocoaPods 프로젝트 버전보다 낮은 버전 라이브러리 추가하기 (0) | 2019.05.14 |
| WKWebView에서 Document안에 있는 html 로드하기 (0) | 2019.05.07 |
댓글
공지사항
최근에 올라온 글
최근에 달린 댓글
- Total
- Today
- Yesterday
링크
TAG
- mac command
- DEX
- zip
- HTML
- multiple commands produce
- cocoapods
- ReactNative 한글
- multidex
- WKwebview
- proguard
- idea command
- idea
- png
- 프로가드
- F
- Podfile
- Monterey
- uicollecionview
- env: python
- 12.5
- TextInput 한글
- local
- jpeg
- Gif
| 일 | 월 | 화 | 수 | 목 | 금 | 토 |
|---|---|---|---|---|---|---|
| 1 | 2 | 3 | 4 | 5 | 6 | |
| 7 | 8 | 9 | 10 | 11 | 12 | 13 |
| 14 | 15 | 16 | 17 | 18 | 19 | 20 |
| 21 | 22 | 23 | 24 | 25 | 26 | 27 |
| 28 | 29 | 30 | 31 |
글 보관함
